Post Most Popular NY Times articles to Discord with QStash
In this post, we will build a simple application that will fetch the most popular viewed articles from the New York Times once a day via a cron job and post them to our internal discord #notifications channel to stay up to date with the outside world - creating discussions around non-technical hot topics.
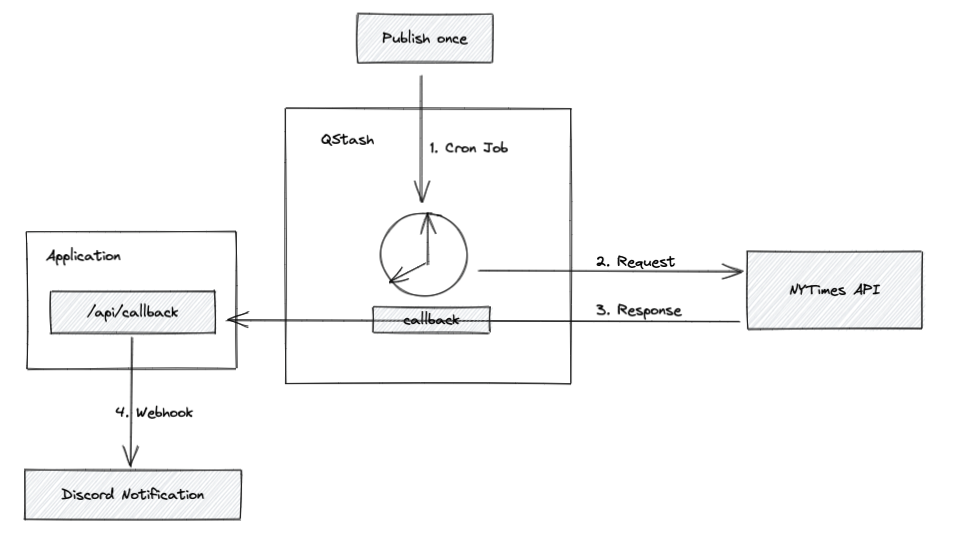
To build this, we'll use the new QStash Callback feature.
Quick recap': What is a callback function?
A callback function is a function that is accessible by another function and is invoked after the first function if that first function completes. It is “called at the back” of the passed function.
Application
If you don't already have an existing Next.js application, you can create one
with npx create-next-app@latest. We will use Next.js to write our API
endpoint.
To build our example, we will need the QStash-SDK. Install it with the following:
npm install @upstash/qstashnpm install @upstash/qstashQStash by Upstash is a powerful messaging and scheduling solution that we will use to create a cron job and include a callback URL that will be called once the published request has finished, including the response of the request.
Create the Callback API endpoint
The only part to code is the /api/callback URL to forward the message received
to the Discord webhook.
Let's break the file down into the parts and start with the imports.
We will need verifySignature to verify that the request is coming from QStash
and type the handler with the Next.js request and response types.
// pages/api/callback.ts_(1/4)
import type { NextApiRequest, NextApiResponse } from "next";

import { verifySignature } from "@upstash/qstash/nextjs";
// pages/api/callback.ts_(1/4)
import type { NextApiRequest, NextApiResponse } from "next";
import { verifySignature } from "@upstash/qstash/nextjs";The sendMessage function will forward the processed API response to our
Discord channel.
Please bare with me that we'll use any as there is not something like a
@types/nytimes-api to type the incoming request quickly. Read more about the
supported properties at
developer.nytimes.com.
Moreover, I won't go too much into the Discord API possibilities. Feel free to
explore the
gist and
extend the example with your use case.
// pages/api/callback.ts_(2/4)
async function sendMessage(json: any) {
  return fetch(process.env.DISCORD_WEBHOOK!, {
    method: "POST",
    headers: {
      "Content-Type": "application/json",
    },
    body: JSON.stringify({
      username: "Best of NYTimes Bot",
      avatar_url: "https://picsum.photos/200", // random image generator
      // we will only post the five most popular articles of the day
      embeds: json.results.slice(0, 5).map((article: any) => {
        return {
          title: article.title,
          description: article.abstract,
          url: article.url,
        };
      }),
    }),
  });
}
// pages/api/callback.ts_(2/4)
async function sendMessage(json: any) {
return fetch(process.env.DISCORD_WEBHOOK!, {
method: "POST",
headers: {
"Content-Type": "application/json",
},
body: JSON.stringify({
username: "Best of NYTimes Bot",
avatar_url: "https://picsum.photos/200", // random image generator
// we will only post the five most popular articles of the day
embeds: json.results.slice(0, 5).map((article: any) => {
return {
title: article.title,
description: article.abstract,
url: article.url,
};
}),
}),
});
}Now that we have the helper function, let's continue with our request handler.
The request we are getting from QStash is base64 encoded. Once decoded, we can
process the result and send the message to our Discord server.
// pages/api/callback.ts_(3/4)
async function handler(req: NextApiRequest, res: NextApiResponse) {
  try {
    // requests from Upstash-Callback are base64-encoded
    const decoded = Buffer.from(req.body.body, "base64");
    const json = JSON.parse(decoded.toString());
    const result = await sendMessage(json);
    if (!result.ok) {
      return res.status(500).end();
    }
    return res.status(201).end();
  } catch (e) {
    return res.status(500).end(e);
  }
}
// pages/api/callback.ts_(3/4)
async function handler(req: NextApiRequest, res: NextApiResponse) {
try {
// requests from Upstash-Callback are base64-encoded
const decoded = Buffer.from(req.body.body, "base64");
const json = JSON.parse(decoded.toString());
const result = await sendMessage(json);
if (!result.ok) {
return res.status(500).end();
}
return res.status(201).end();
} catch (e) {
return res.status(500).end(e);
}
}Finally, we export our handler, wrapped by the verifySignature function, that
needs to access the raw-body of the request via the exported config (see
Nextjs
docs).
// pages/api/callback.ts_(4/4)
export const config = {
  api: {
    bodyParser: false,
  },
};

export default verifySignature(handler);
// pages/api/callback.ts_(4/4)
export const config = {
api: {
bodyParser: false,
},
};
export default verifySignature(handler);Get the secrets / API keys
Go to your QStash dashboard and copy and
paste the QSTASH_CURRENT_SIGNING_KEY and QSTASH_NEXT_SIGNING_KEY into your
.env.local environment variables.
For Discord, you can select the “Edit Channel” button and go to “Integrations > Webhooks” directly inside the App to “Copy [the] Webhook URL”.

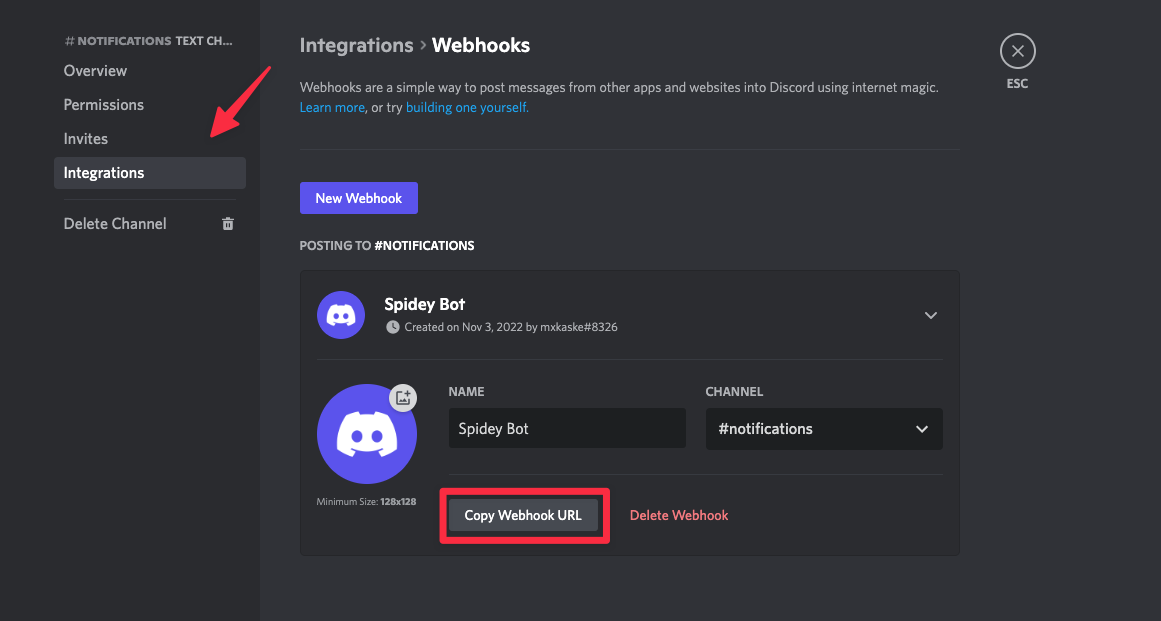
Your .env.local file should include the following:
## .env.local
QSTASH_CURRENT_SIGNING_KEY=<YOUR_CURRENT_KEY>
QSTASH_NEXT_SIGNING_KEY=<YOUR_NEXT_KEY>
DISCORD_WEBHOOK=https://discord.com/api/webhooks/XXX/YYY-ZZZZ
## .env.local
QSTASH_CURRENT_SIGNING_KEY=<YOUR_CURRENT_KEY>
QSTASH_NEXT_SIGNING_KEY=<YOUR_NEXT_KEY>
DISCORD_WEBHOOK=https://discord.com/api/webhooks/XXX/YYY-ZZZZStart the development server for the changes to take effect.
$ npm run dev$ npm run devTo access the New York Times API, you'll need to create an account at developer.nytimes.com and create an App to access the API key. Be aware that your API is restricted by default. Enable the “Most Popular API”.
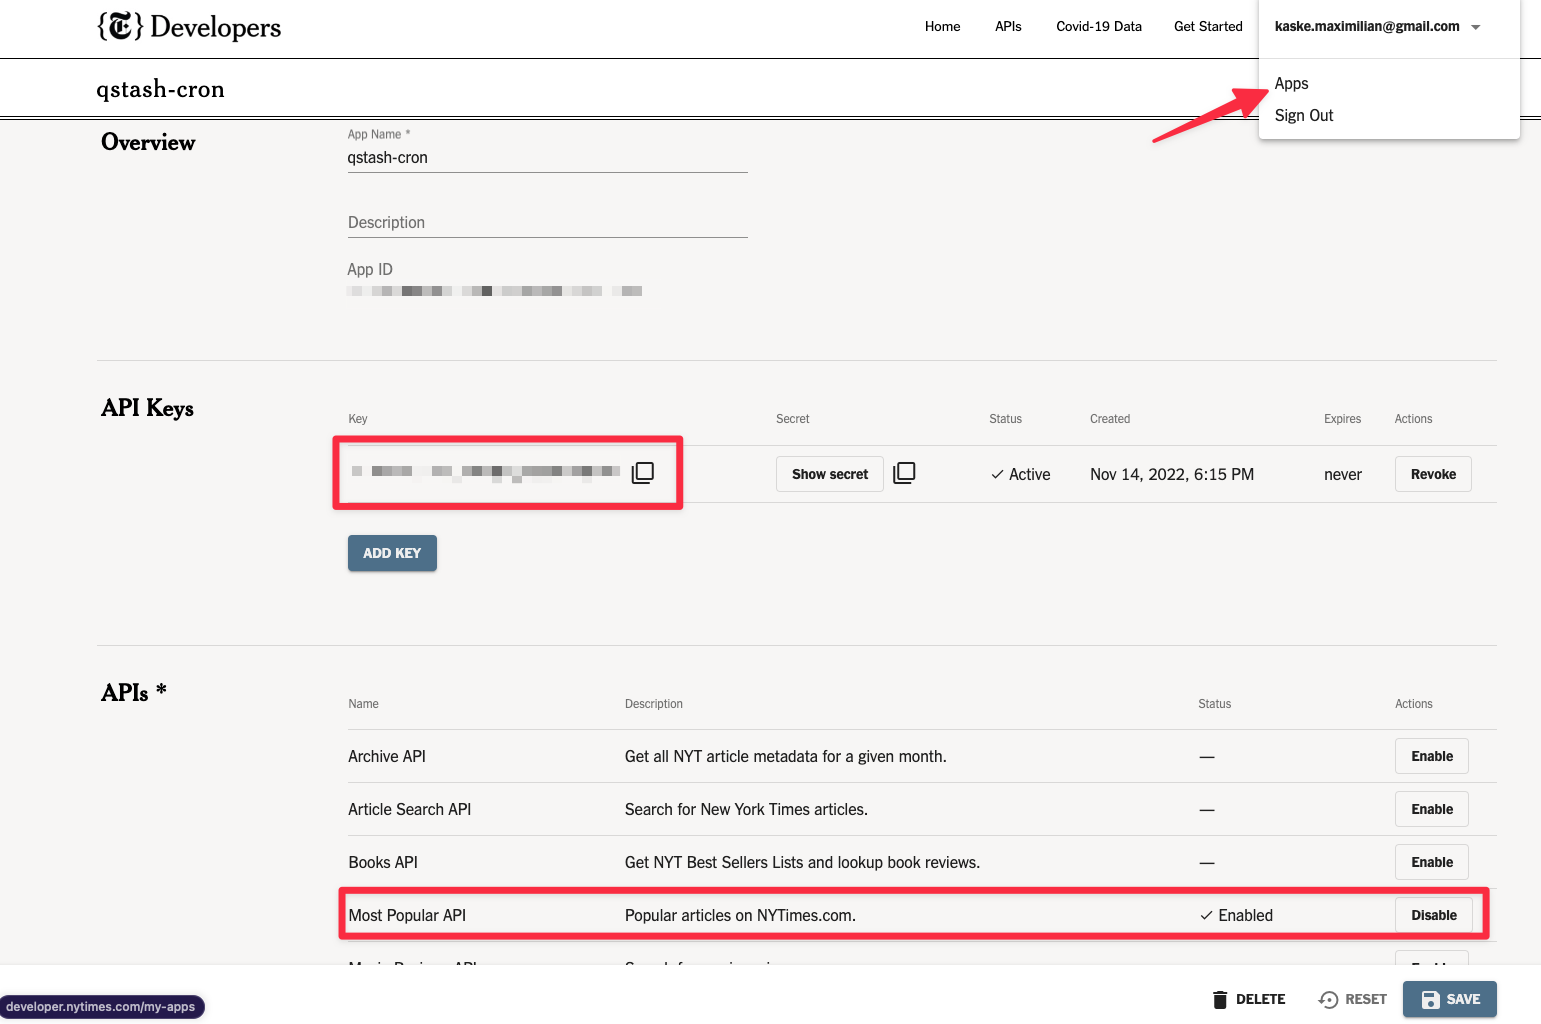
You can check if it works by calling
https://api.nytimes.com/svc/mostpopular/v2/viewed/1.json?api-key=<your-key> in
the browser or any API platform like postman.
Before configuring QStash, we have to publicly access our /api/callback. For
that, we have two options:
- Either run it locally with an ngrok tunnel (because localhost is not publicly accessible)
$ ngrok http 3000 ## port number$ ngrok http 3000 ## port number- Or deploying it to a hosting provider (e.g. vercel.com - don't forget to include the environment variables).
For the sake of this example, I've chosen the ngrok option.
Create the schedule
We can use the QStash Request Builder to start with and add the
-H "Upstash-Callback: XXX-YYY-ZZZ.ngrok.io/api/callback" \ value separately as
it isn't included for now.
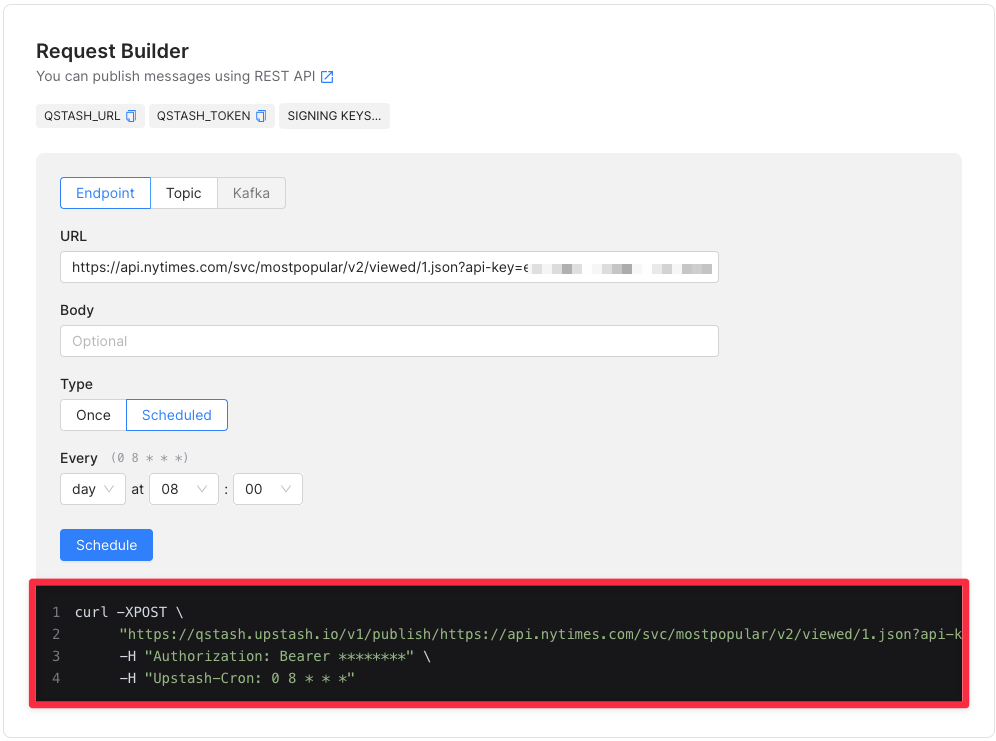
Running the following command will then start our cron job.
curl -XPOST "https://qstash.upstash.io/v1/publish/https://api.nytimes.com/svc/mostpopular/v2/viewed/1.json?api-key=your-key" \
  -H "Upstash-Callback: XXX-YYY-ZZZ.ngrok.io/api/callback" \
	-H "Upstash-Cron: 0 8 * * *" \
  -H "Authorization: Bearer XXX"
curl -XPOST "https://qstash.upstash.io/v1/publish/https://api.nytimes.com/svc/mostpopular/v2/viewed/1.json?api-key=your-key" \
-H "Upstash-Callback: XXX-YYY-ZZZ.ngrok.io/api/callback" \
-H "Upstash-Cron: 0 8 * * *" \
-H "Authorization: Bearer XXX"Let's decompose the request:
- QStash will call the NY Times API
https://qstash.upstash.io/v1/publish/https://api.nytimes.com/svc/mostpopular/v2/viewed/1.json?api-key=<your-key>and - return the result to the defined callback at
"Upstash-Callback: XXX-YYY-ZZZ.ngrok.io/api/callback" - every morning at 8 am via
"Upstash-Cron: 0 8 * * *"(learn more at crontab.guru) - providing authorization with
"Authorization: Bearer XXX"to allow our call to be also verified viaverifySignature.
Conclusion
Let's wrap it up. Every morning at 8 am, QStash will request the most popular NY
Times articles of the day and will forward the results to our callback URL
(/api/callback) where we will post them to our Discord channel.
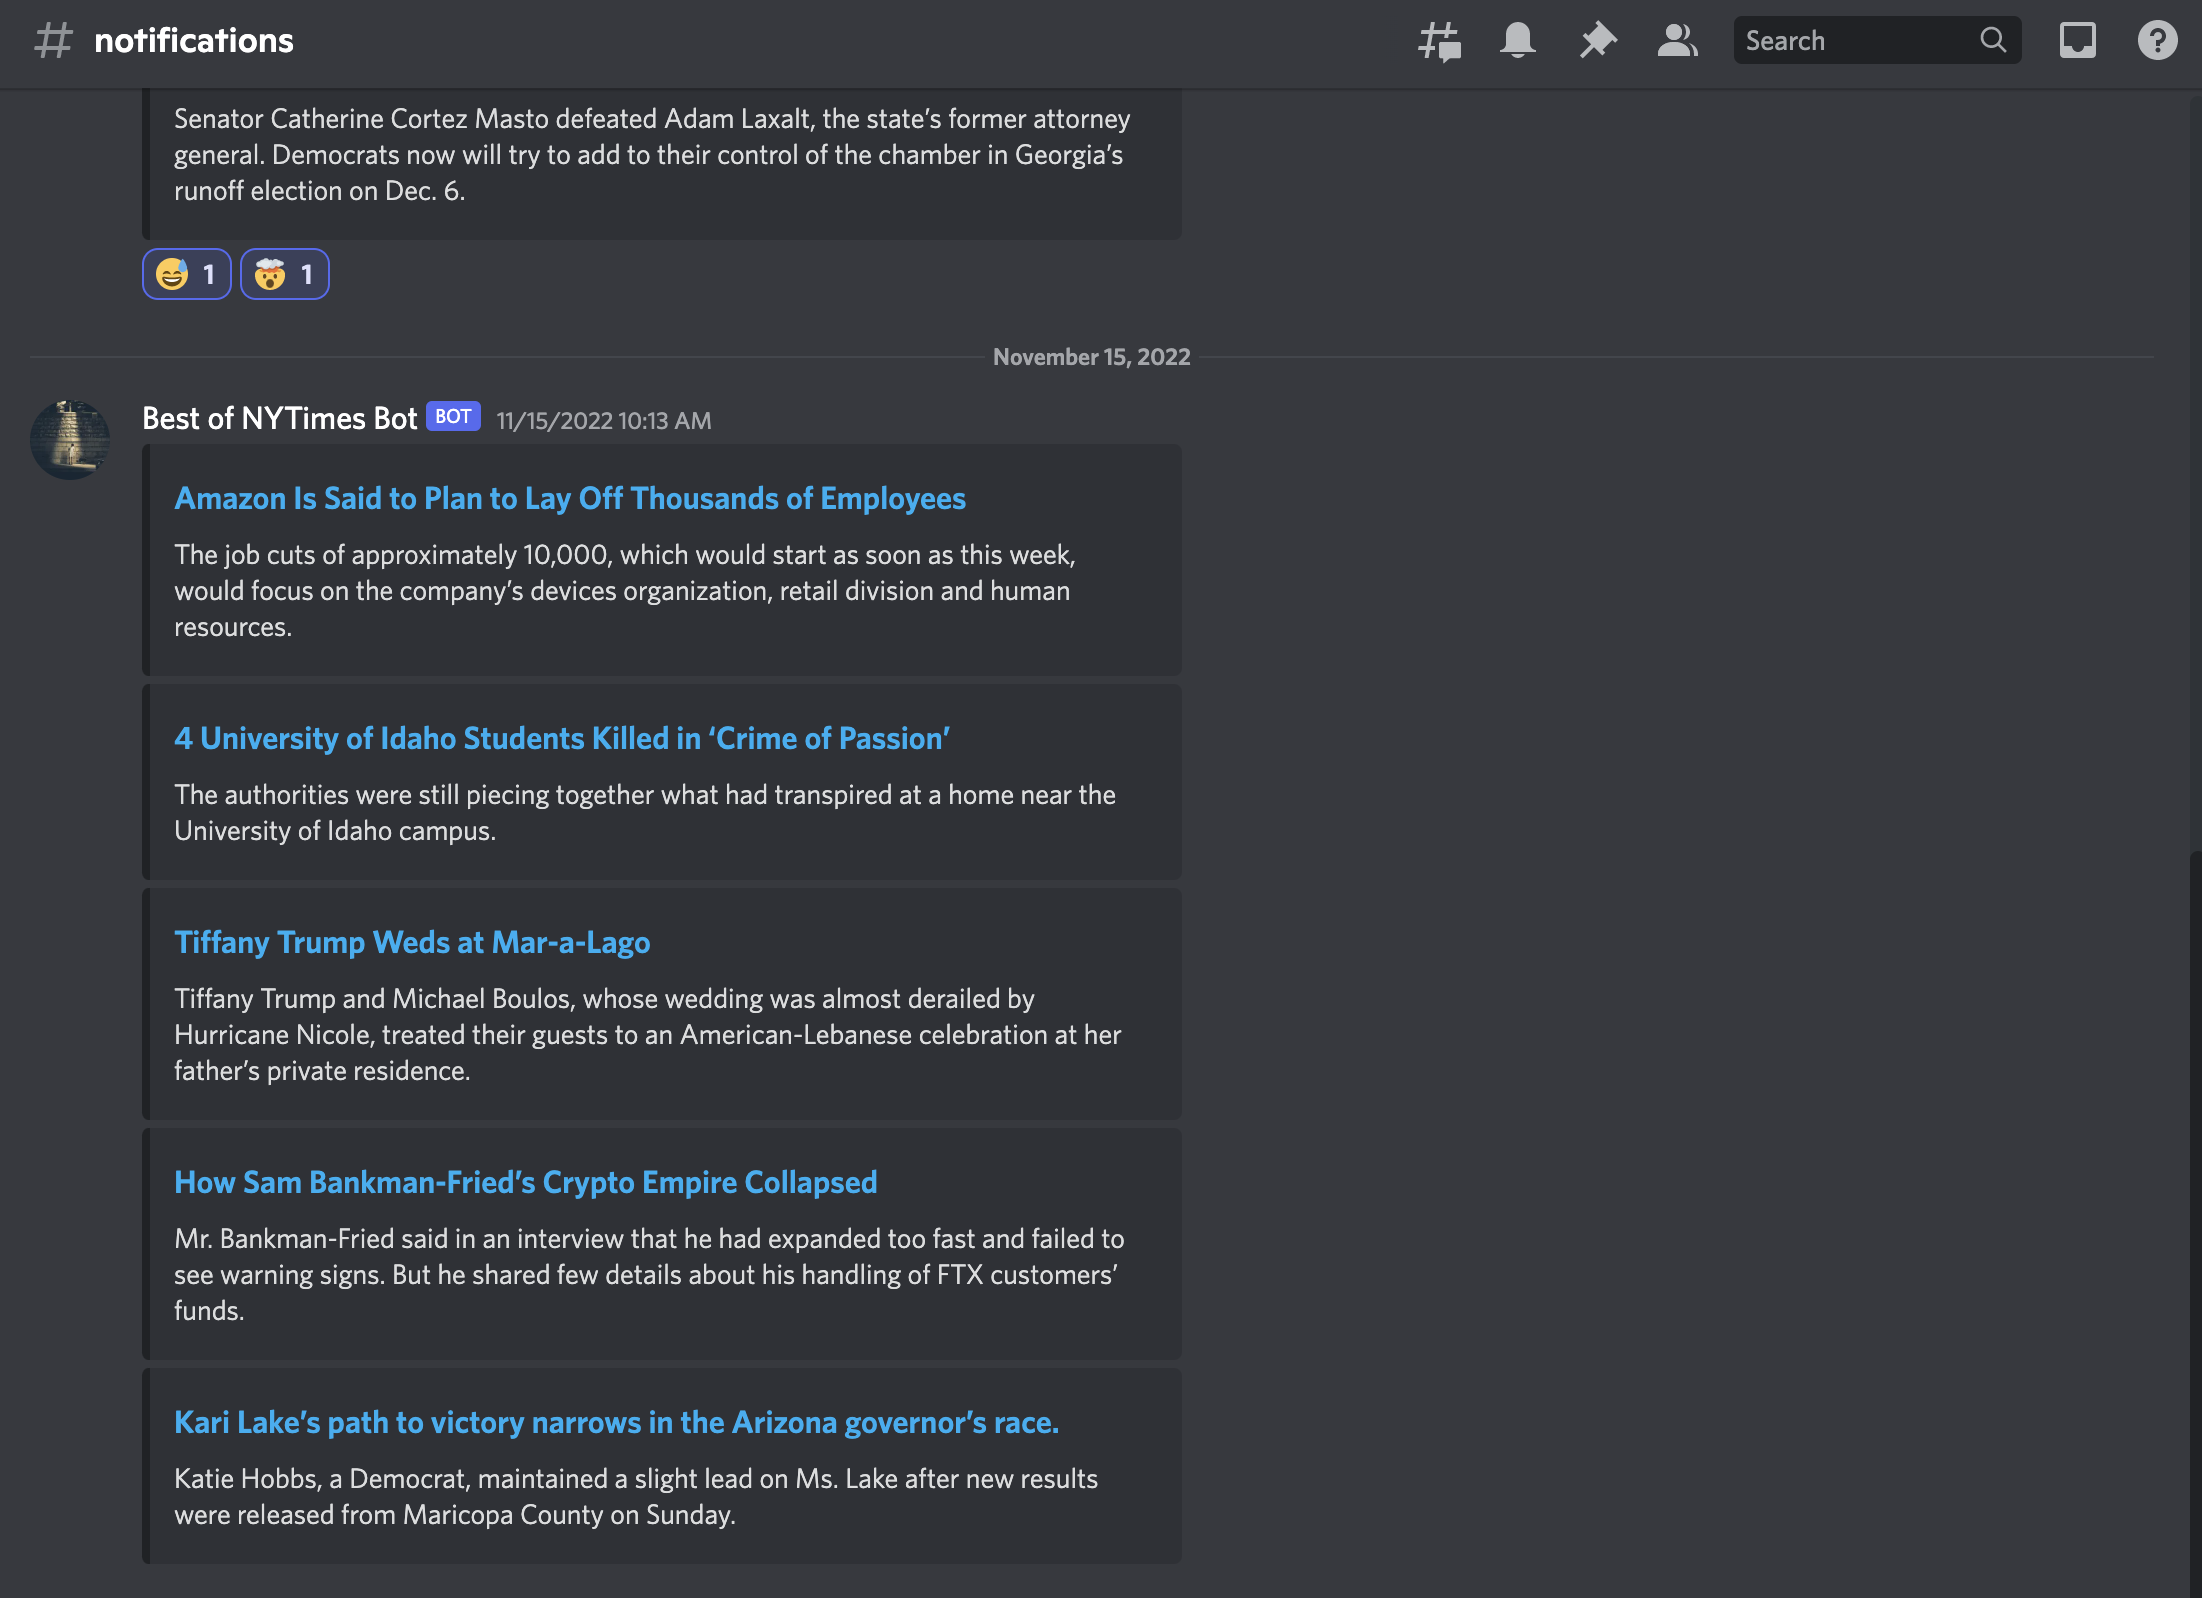
Check out the full example here.
