Sync Redis state to your database using QStash
In a previous article, we discussed how we can use Redis to store the state of your user's quota on a full-stack Next.js app. Doing this allows us to improve the performance of our application, as Redis in general is much faster than a database.
Upstash Redis especially is a great choice for this use case, as it is a fully managed Redis database and accessible via HTTP. This means we can even use edge runtimes like Vercel to run our code close to the user with minimum latency.
What is QStash?
QStash is an HTTP based messaging and scheduling solution for the serverless and edge runtimes. In other words, it allows you to run CRON jobs by sending HTTP requests.
CRON jobs are a great way to schedule tasks to run at a specific time. This CRON job can take as much time as it wants to run without impacting the performance of your application or end-users.
The goal of our CRON job in this article is to sync the state of our users' quota from Redis to our database. We will make this task run every hour.
Creating the CRON job endpoint with QStash
Here is a quick recap of the previous article, of how we handle the state of our users' quota in Redis:
// Key stored in Redis. A key is created for each user, and made unique by their ID.
const quotaKey = `user:${userId}:quota`;

// Call the INCR command to increment the value of the key by 1.
const quota = await redis.incr(quotaKey);

// If the value of the key is 1, it means the key has been created.
// We can set an expiration date of 24 hours to this key by using the EXPIRE command.
if (quota === 1) {
  await redis.expire(quotaKey, 60 * 60 * 24);
}
// Key stored in Redis. A key is created for each user, and made unique by their ID.
const quotaKey = `user:${userId}:quota`;
// Call the INCR command to increment the value of the key by 1.
const quota = await redis.incr(quotaKey);
// If the value of the key is 1, it means the key has been created.
// We can set an expiration date of 24 hours to this key by using the EXPIRE command.
if (quota === 1) {
await redis.expire(quotaKey, 60 * 60 * 24);
}Given this code, we can now create a CRON job endpoint using QStash. Our CRON job endpoint will be triggered at the URL /api/cron/update-usage.
Let's create a new file for our Next.js endpoint:
touch pages/api/cron/update-usage.tstouch pages/api/cron/update-usage.tsThen, we want to make sure only QStash can trigger this endpoint, this is what @upstash/qstash handles for us. If we don't do this, anyone could potentially trigger the CRON job endpoint which could lead to security issues.
Let's install @upstash/qstash:
npm install @upstash/qstashnpm install @upstash/qstashWe can now focus on the code of our CRON job endpoint.
Here is a quick recap of what we will do:
- Get all users' quota keys from Redis using
SCAN(performant cursor-based pagination). - For each key found from the
SCAN, create ausersarray of objects containing the user's ID and their quota. - Create a transaction for each user inside the
usersarray to update their quota in the database. This is done using Prisma. - Export the endpoint function with the
verifySignaturefunction from@upstash/qstash/nextjsto make sure only QStash can trigger the endpoint.
The full code endpoint is here, I made sure to comment every aspect of the code:
// /pages/api/cron/update-usage.ts
import type { NextApiRequest, NextApiResponse } from "next";

import { verifySignature } from "@upstash/qstash/nextjs";

import prisma from "@/lib/prisma";

// Generate an Upstash Redis instance using environment variables.
// Make sure those are defined in your .env file.
const redis = new Redis({
  url: process.env.UPSTASH_REDIS_REST_URL!,
  token: process.env.UPSTASH_REDIS_REST_TOKEN!,
});

// Required by `@upstash/qstash`.
export const config = { api: { bodyParser: false } };

// Update the usage of every user by pulling the data from the Redis database into the Prisma database.
async function handler(req: NextApiRequest, res: NextApiResponse) {
  // Contains all the keys found during the `SCAN`.
  const keys: string[] = [];
  // Current position of the cursor, updated after each `SCAN`.
  let cursor = 0;

  // Execute the cursor-based pagination using the `SCAN` command.
  // Redis return `0` when the cursor is at the end of the pagination.
  do {
    const [nextCursor, newKeys] = await redis.scan(cursor, {
      // Match the pattern of the keys we want to find, where `*` is a wildcard.
      match: "user:*:quota",
      // Limit the number of keys returned by the `SCAN` command.
      count: 10,
    });

    cursor = nextCursor;
    keys.push(...newKeys);
  } while (cursor !== 0);

  // Array of objects containing the user's ID and their quota.
  const users: { id: number; quota: number }[] = [];

  // Get the usage of each user from Redis based on the keys found.
  for (const key of keys) {
    // A key should be in the format `user:${id}:quota`. Split the key to get the ID.
    const id = key.split(":")[1];
    // Get the current quota of the user using the `GET` command.
    const quota = await redis.get(`user:${id}:quota`);

    users.push({ id: parseInt(id, 10), quota });
  }

  // Create a transaction for each user to update their quota in the database.
  const promises = users.map((user) =>
    prisma.user.update({
      where: { id: user.id },
      data: { quota: user.quota },
    }),
  );

  // Run all transactions.
  await Promise.all(promises);

  return res.status(200).json({ message: "OK" });
}

// Export the handler with the `verifySignature` function to make sure only
// QStash can authenticate to trigger the CRON job.
export default verifySignature(handler);
// /pages/api/cron/update-usage.ts
import type { NextApiRequest, NextApiResponse } from "next";
import { verifySignature } from "@upstash/qstash/nextjs";
import prisma from "@/lib/prisma";
// Generate an Upstash Redis instance using environment variables.
// Make sure those are defined in your .env file.
const redis = new Redis({
url: process.env.UPSTASH_REDIS_REST_URL!,
token: process.env.UPSTASH_REDIS_REST_TOKEN!,
});
// Required by `@upstash/qstash`.
export const config = { api: { bodyParser: false } };
// Update the usage of every user by pulling the data from the Redis database into the Prisma database.
async function handler(req: NextApiRequest, res: NextApiResponse) {
// Contains all the keys found during the `SCAN`.
const keys: string[] = [];
// Current position of the cursor, updated after each `SCAN`.
let cursor = 0;
// Execute the cursor-based pagination using the `SCAN` command.
// Redis return `0` when the cursor is at the end of the pagination.
do {
const [nextCursor, newKeys] = await redis.scan(cursor, {
// Match the pattern of the keys we want to find, where `*` is a wildcard.
match: "user:*:quota",
// Limit the number of keys returned by the `SCAN` command.
count: 10,
});
cursor = nextCursor;
keys.push(...newKeys);
} while (cursor !== 0);
// Array of objects containing the user's ID and their quota.
const users: { id: number; quota: number }[] = [];
// Get the usage of each user from Redis based on the keys found.
for (const key of keys) {
// A key should be in the format `user:${id}:quota`. Split the key to get the ID.
const id = key.split(":")[1];
// Get the current quota of the user using the `GET` command.
const quota = await redis.get(`user:${id}:quota`);
users.push({ id: parseInt(id, 10), quota });
}
// Create a transaction for each user to update their quota in the database.
const promises = users.map((user) =>
prisma.user.update({
where: { id: user.id },
data: { quota: user.quota },
}),
);
// Run all transactions.
await Promise.all(promises);
return res.status(200).json({ message: "OK" });
}
// Export the handler with the `verifySignature` function to make sure only
// QStash can authenticate to trigger the CRON job.
export default verifySignature(handler);The hardest part is done!
Setting up QStash
Now before pushing our code, we need to setup QStash. QStash provides a generous free tier, we can use up to 500 requests per day.
Login inside your Upstash Console and click on the QStash tab.
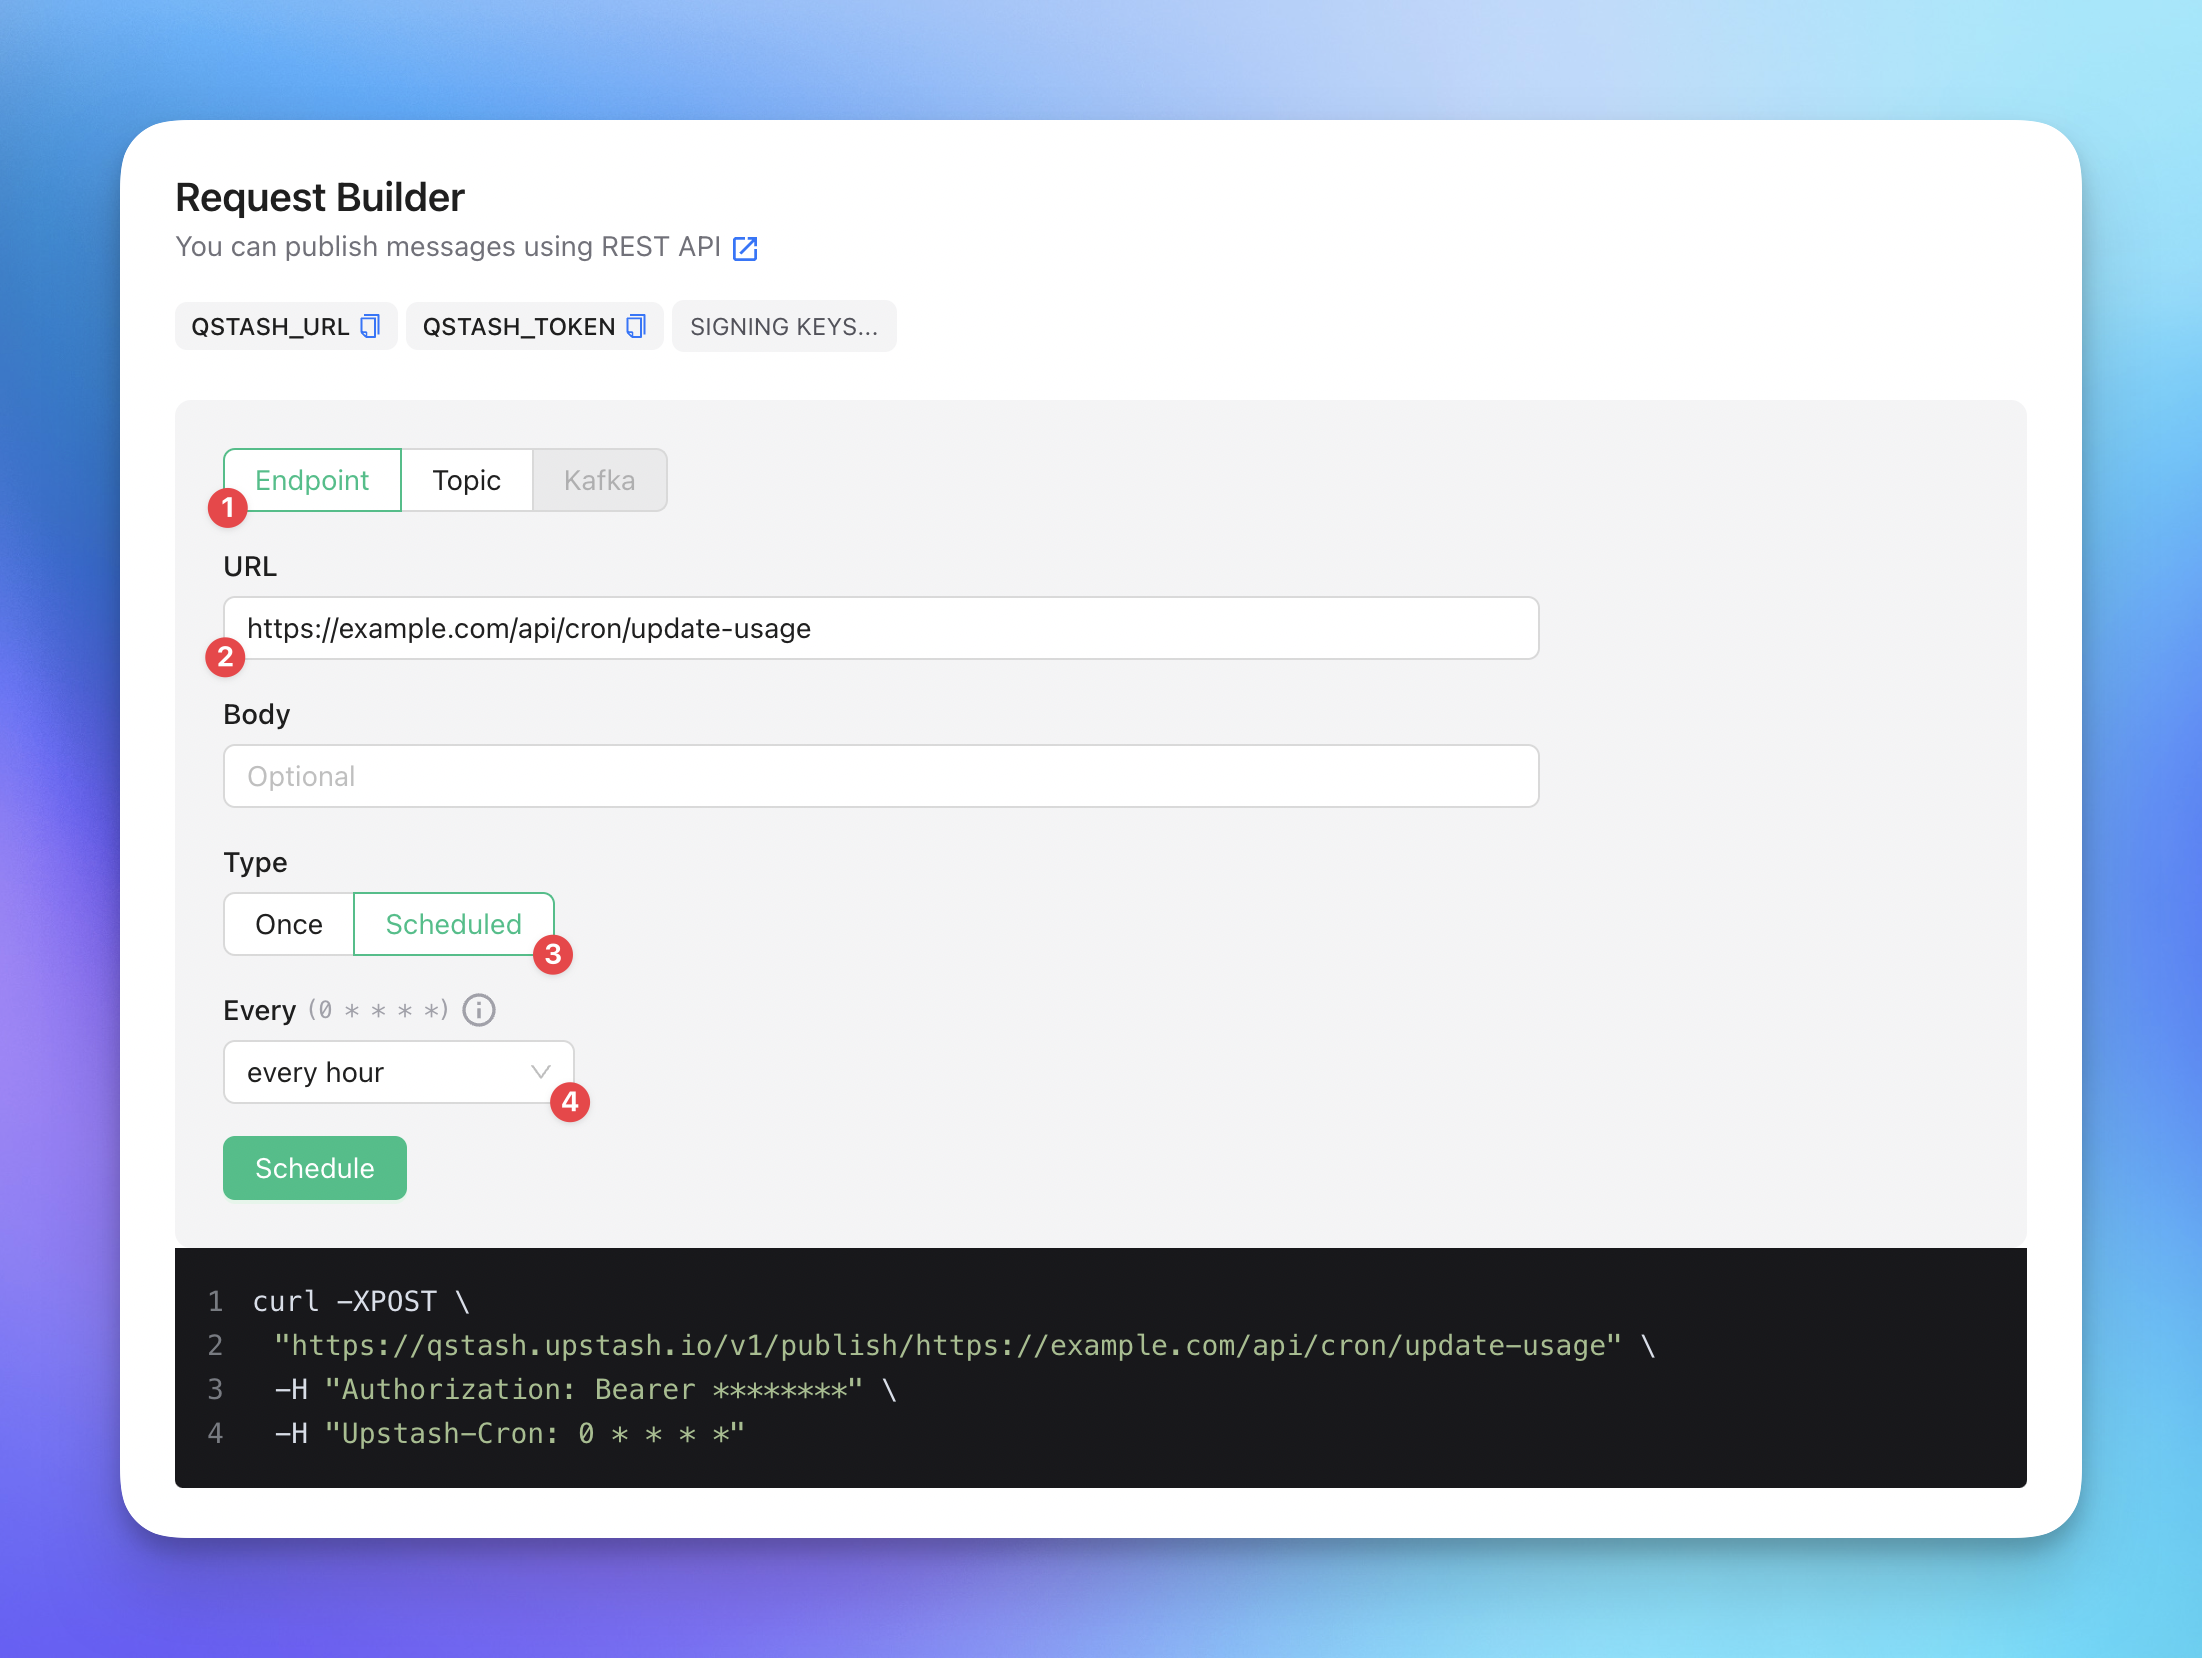
Then, let's create a new scheduled CRON job using the Request Builder. It's very simple thanks to the intuitive UI:

After clicking on the Schedule button, if you scroll down, you will see your CRON job on the Scheduled Jobs section:

Last step, we need to setup 2 environment variables in our Next.js application. Those variables will be added where our Next.js application is hosted, in this case on Vercel.
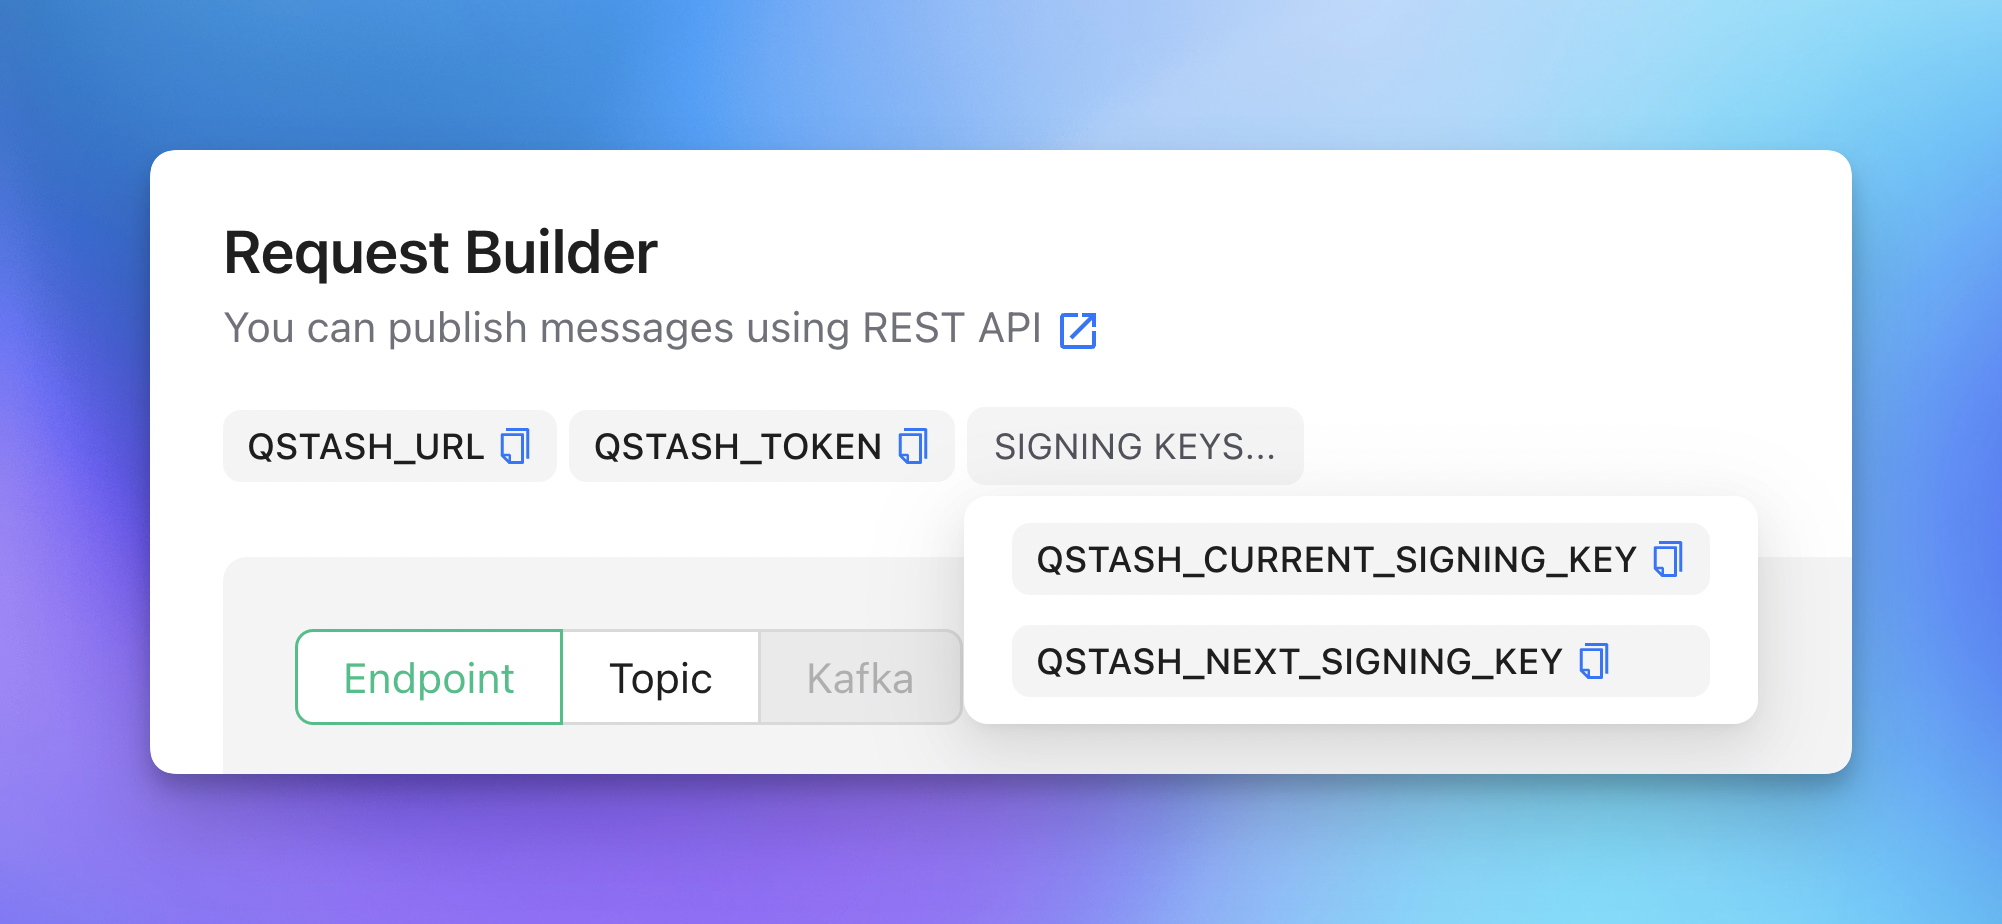
In the Request Builder section, there are 2 environment variables ready to be copied:
QSTASH_CURRENT_SIGNING_KEYQSTASH_NEXT_SIGNING_KEY
These are necessary to authenticate the incoming message. Otherwise anyone would be able to call your endpoint.

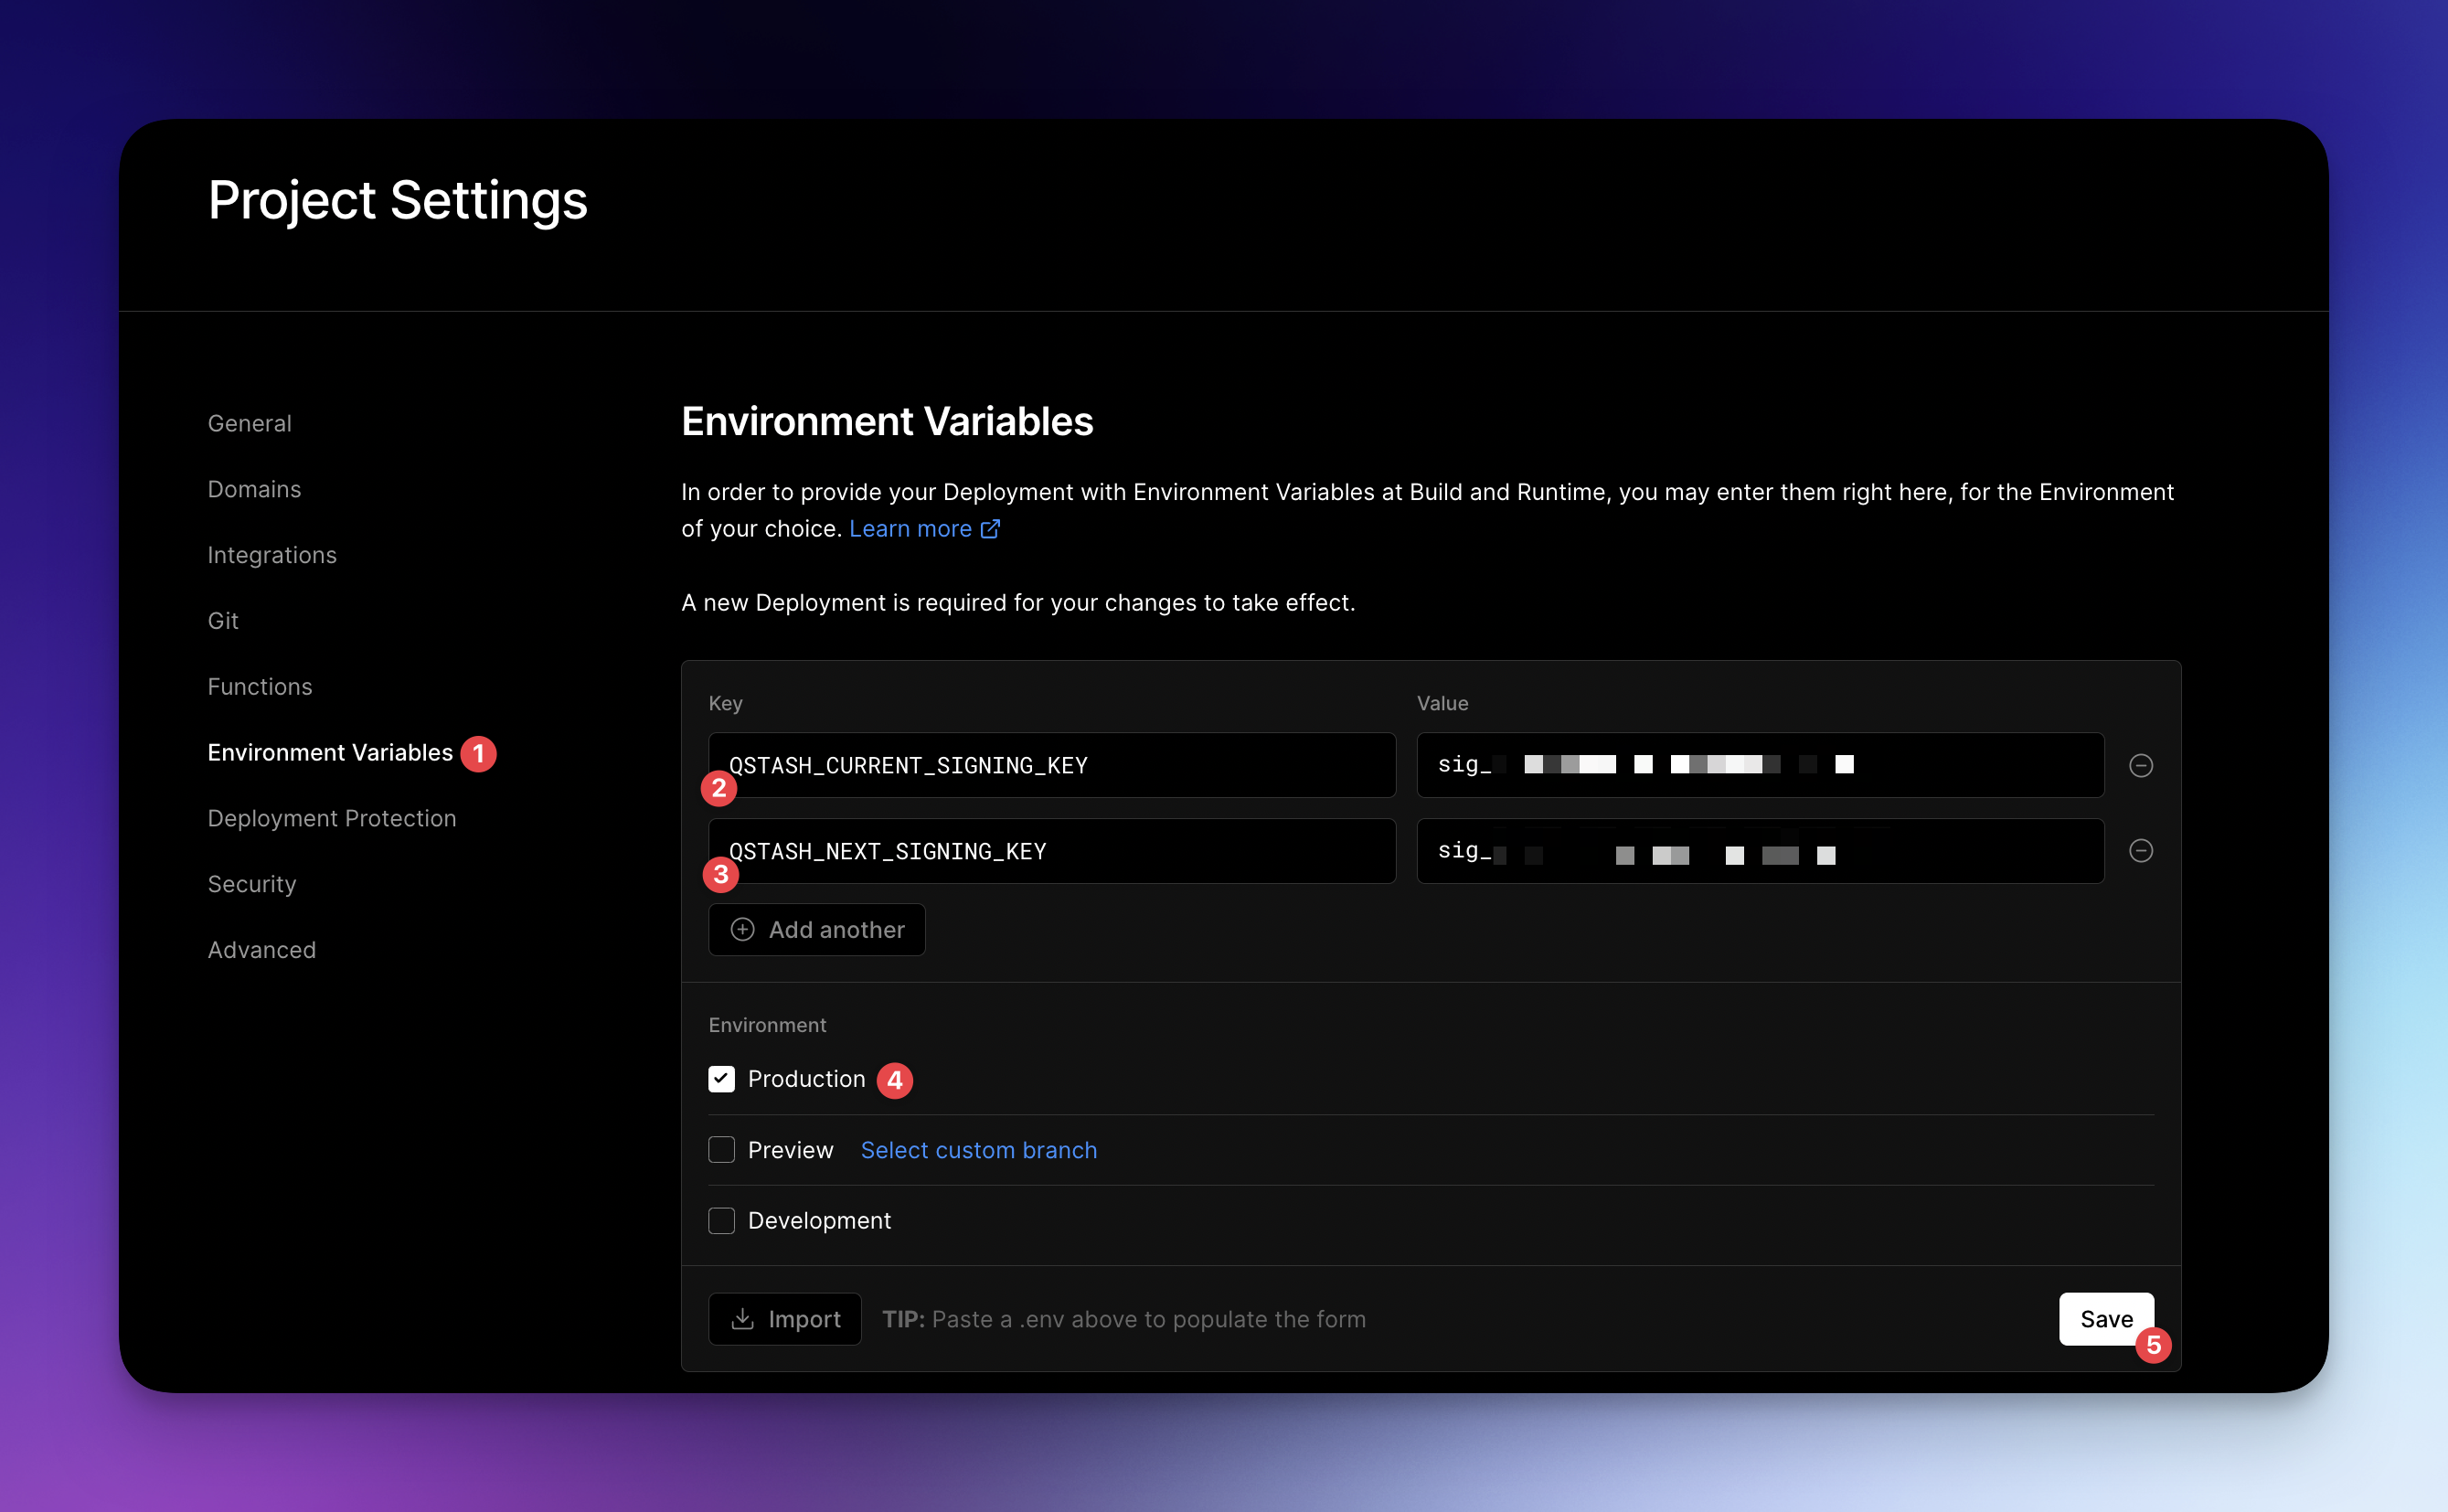
Once you have those variables, you can add them to your Vercel project.
To do this, go to your Vercel project, click on Settings and then on Environment Variables:

After adding the 2 environment variables, you can now push your code.
QStash will periodically trigger the CRON job endpoint and update the usage of every user every hour.
Conclusion
Upstash provides a lot of tools for the serverless environment. We can use QStash and Redis together to create performant and scalable applications for many use cases.
If you want to see it live, the same system has been implemented on fastsheet, a tool that turns your spreadsheets into an API.
